Installation instructions for sunblinds
All installation types of the roller blinds supplied by us have in common that the dimensions from the outer edge of the left side guide to the outer edge of the right side guide is always used as the width for the order dimensions, together with the upper edge of the box to the lower edge of the side guide as the height dimension. For all types of installation, the side guides are used to hold the casing. This ensures trouble-free installation. The side guides are fixed on the back with a continuous adhesive strip and 2 locking screws per side guide. However, pure adhesive mounting is also possible, in which case the drill holes in the side guides are missing. (Please state explicitly in the order comment that no drill holes are desired in the side guides). For all dimensions, always subtract 2 mm in height as well as in width to compensate for possible inaccuracies of the window.
In the following we will explain the three most common mounting ways:
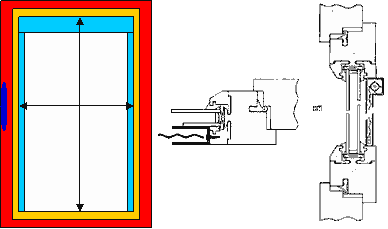
1. Mounting option GL (between the glazing beads):
Applicable for rectangular glazing beads, e.g. for metal windows. Measurements are taken exactly between the glazing beads, as explained in the adjacent graphic. The minimum depth of the glazing bead must be 10 mm. The side guides are fastened using a continuous adhesive strip and 2 locking screws per side guide.
Mounting of the side guides for GL mounting:
(Red = window frame, Yellow = glazing bead, Blue = roller blind and window olive)
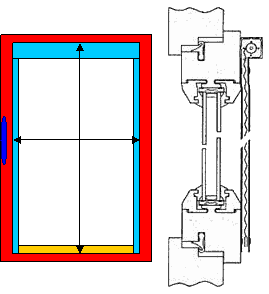
2. Mounting option FL (on the sash, exactly on the glazing beads):
For all windows with beveled glazing beads must be mounted on the sash. Advantage: drilling is done only in the glazing beads. The glazing bead must be at least 10 mm wide. The side guides are attached using a continuous adhesive strip and 2 locking screws per side guide.
Mounting of the side guide for FL mounting:
(Red = window frame, Yellow = glazing bead, Blue = roller blind and window olive)
3. Mounting option FL (on the sash, on the frame):
The glazing beads are partially covered or not covered at all. This type of installation is required when the glazing beads are not at least 10 mm wide or guide rails and boxes should not extend beyond the glazing beads. Here special attention must be paid to the function of the window olive. The side guides are fastened on the back with a continuous adhesive strip and 2 locking screws per side guide.
(Red = window frame, Yellow = glazing bead, Blue = roller blind and window olive)